Table des matières
Compilation depuis les sources
Pour ubuntu 16.04
sudo apt-get install libpython3-dev libpython3.5-dev libopenimageio-dev  libopenimageio1.6 openimageio-tools libopenimageio-doc python-openimageio cmake libx11-dev libjpeg-dev libpng12-dev libz3-dev libfreetype6-dev libboost-all-dev libglew-dev libopenexr-dev libopenjpeg-dev libopenal-dev python3-numpy libjemalloc-dev
wget http://download.blender.org/source/blender-2.77a.tar.gz
tar xvf ../blender-2.77a.tar.gz
mkdir cmake-make
cd cmake-make
cmake ../blender-2.77a/
make -j4
sudo make install
Pour ubuntu 14.04:
Nous avons eu des problèmes de compilation, dus à des problèmes de version de librairies, il est nécessaire d'avoir: cmake 3.2 et python 3.5
Après essai infructueux de:MAJ CMake 3.2 , nous sommes passé en 16.04
Scene blender camera Rolling
Enregistrement date associée à chaque rayon
modification des sources blender pour gérer le modèle caméra rolling: https://developer.blender.org/D1624
fichier: intern/cycles/kernel/kernel_camera.h
- c
			ray->time += (time - 0.5f) * (1.0f - duration) + 0.5f;
			}
			else {
				ray->time = time;
			}
//BVDP
FILE *f;
f=fopen("test.bv","a");
fprintf(f,"%d , %d , %lf\n", x,y,(double)ray->time);
fclose(f);
//!BVDP
		}
	}
#endif
	/* sample */
	if(kernel_data.cam.type == CAMERA_PERSPECTIVE)
		camera_sample_perspective(kg, raster_x, raster_y, lens_u, lens_v, ray);
	else if(kernel_data.cam.type == CAMERA_ORTHOGRAPHIC)
Interpolation réalisée par blender
Le code pour rolling shutter est à la ligne (l322) dans intern/cycles/kernel/kernel_camera.h Le calcul du temps correspondant à chaque partie du rendu est fait par:
ray->time = (ray->time - 0.5f) * duration;
la demande de rendu à cet instant par:
if(kernel_data.cam.type == CAMERA_PERSPECTIVE)
  camera_sample_perspective(kg, raster_x, raster_y, lens_u, lens_v, ray);
En (l42) on trouve la fonction de calcul du rayon primaire:
ccl_device void camera_sample_perspective(KernelGlobals *kg, float raster_x, float raster_y, float lens_u, float lens_v, ccl_addr_space Ray *ray)
Pour l'interpolation des matrices caméras (en cas de changement des paramètres intrinsèques):
if(kernel_data.cam.have_perspective_motion) {
Pour l'interpolation des matrices de pose:
if(kernel_data.cam.have_motion) {
  #ifdef __CAMERA_MOTION__
    if(kernel_data.cam.have_motion) {
  #ifdef __KERNEL_OPENCL__
    const MotionTransform tfm = kernel_data.cam.motion;
    transform_motion_interpolate(&cameratoworld,((const DecompMotionTransform*)&tfm), ray->time);
  #else
    transform_motion_interpolate(&cameratoworld,((const DecompMotionTransform*)&kernel_data.cam.motion), ray->time);
  #endif
L'interpolation de pose est réalisée par la fonction transform_motion_interpolate dans intern/cycles/util/util_transform.h (l410)

Pour l'interpolation des quaternions, elle utilise:
ccl_device_inline float4 quat_interpolate(float4 q1, float4 q2, float t) (l317)

Modèle de caméra
Pour les réglages de caméra sous blender, voir: https://en.wikibooks.org/wiki/Blender_3D:_Noob_to_Pro/Understanding_the_Camera
Matrice caméra: 
Sous blender les caméras sont gérées avec des pixels carrés ( ) et définies soit par une focale en mm soit par un champ de vision en degrés.
Exemple pour une image générée de 1920*1080 pixels
La position du point principal au centre de l'image, pour un indicage des images type C (pixel coin haut gauche en 0.0):  et
et 
Le calcul des focales pixelliques se fait ainsi:
- pour une focale 35mm correspondant à une dimension horizontale de capteur de 32mm affichant 1920 pixels:
 pixels
 - pour un champ de vision horizontal de 49.134 degrés. De chaque coté du point principal, il y a 960 pixels pour 24.567 degrés:
 , soit
  pixels
Paramètre extrinsèques
Attention, les caméras blender pointent vers les Z négatifs, il faut donc ajouter une rotation de 180° à la matrice rotation. Todo jessica: compléter.
Export des données Zmap
TODO pour jessica: expliquer le processus de création de la chaine de rendu pour générer les zmap au format openExr.
http://www.cs.tut.fi/kurssit/SGN-5406/vrlab2012/blender-manual.pdf
http://blender.stackexchange.com/questions/33293/z-buffer-output-from-blender-as-file
https://www.blender.org/manual/render/blender_render/layers.html#
Pour l'exploitation des images au format openExp, voir la page openexr.
Rendu depuis un script python
Les commandes pythons correspondantes aux actions en cours dans la GUI sont affichées dans la console python intégrée: https://www.youtube.com/watch?v=K0yb4sZ7B4g
https://wiki.blender.org/index.php/Doc:FR/2.4/Manual/Extensions/Python/Example
Exemple de rendu avec caméra fisheye: https://blender.stackexchange.com/questions/32848/script-for-rendering-a-simple-scene
Execution d'un script
Utiliser l’interpréteur python intégré à blender depuis la ligne de commande
blender --python test.py
- test.py
import bpy
import numpy as np

import sys

# switch on nodes
bpy.context.scene.use_nodes = True
tree = bpy.context.scene.node_tree
links = tree.links

# clear default nodes
for n in tree.nodes:
    tree.nodes.remove(n)

# create input render layer node
rl = tree.nodes.new('CompositorNodeRLayers')
rl.location = 185,285

# create output node
v = tree.nodes.new('CompositorNodeViewer')
v.location = 750,210
v.use_alpha = False

# create output node
of_c_node = tree.nodes.new('CompositorNodeOutputFile')
of_c_node.location = 600, 200
#of_node.base_path =
of_c_node.format.file_format = 'PNG'

# Links
links.new(rl.outputs[0], v.inputs[0])  # link Image output to Viewer input
links.new(rl.outputs[0], of_c_node.inputs[0])

# Define path where to save image
of_c_node.base_path = "./images_test_png"

# render
bpy.ops.render.render()

# get viewer pixels directly
pixels = bpy.data.images['Viewer Node'].pixels
print(len(pixels)) # size is always width * height * 4 (rgba)

# copy buffer to numpy array for faster manipulation
arr = np.array(pixels[:])
print('one pixel \n',arr[100:104])

#exit blender
sys.exit(0)
Installation blender sur compte utilisateur d'une machine du LAAS et utilisation à distance
ssh  bvandepo@cuda.laas.fr
wget https://bvdp.inetdoc.net/files/blender/blender-2.74-linux-glibc211-x86_64.tar.bz2
tar -jxvf blender-2.74-linux-glibc211-x86_64.tar.bz2
rm  blender-2.74-linux-glibc211-x86_64.tar.bz2
cd  blender-2.74-linux-glibc211-x86_64
./blender
Utiliser l'option -b pour désactiver le rendu openGL. Par exemple pour exécuter un script python:
./blender --python test.py -b
Pour lancer le rendu à distance:
ssh -t bvandepo@cuda.laas.fr "cd blender-2.74-linux-glibc211-x86_64 && ./blender --python test.py -b"
Copier la clef publique rsa pour ne pas avoir à saisir le mot de passe à chaque connexion
Blender et le ray-tracing
Blender a deux modes de rendu possible : le mode par défaut “blender render” et le mode ray-tracing nommé “cycles”. Les documentations associées sont :
Lien fournissant une comparaison entre les deux moteurs de rendu :
https://blender.stackexchange.com/questions/5820/how-is-cycles-different-from-blender-internal
Notions à connaître : ray-tracing et anti-aliasing (cours) :
https://www.cs.cmu.edu/afs/cs/academic/class/15462-s09/www/lec/13/lec13.pdf
Ray-tracing (et anti-aliasing) du moteur de rendu Cycles :
https://docs.blender.org/manual/en/dev/render/cycles/settings/scene/render/integrator.html https://docs.blender.org/manual/en/dev/render/cycles/settings/scene/render/light_paths.html
Anti-aliasing du moteur de rendu Blender (par défaut) :
https://docs.blender.org/manual/en/dev/render/blender_render/settings/antialiasing.html
Script python détaillé pour le moteur de rendu Blender (par défaut)
Le script suit les étapes suivantes :
- Sélection de l'outil GPU : Il faudra vérifier au préalable le type de votre carte graphique. “compute_device_type” peut être “CUDA”, “OpenCL”, “NONE” et “device” peut être “CPU” ou “GPU” voir https://docs.blender.org/manual/en/dev/render/cycles/gpu_rendering.html.
- Initialisation de blender : suppression des objets par défaut (modèle du cube, la lampe et la caméra)
- Ajout d'objets : modèles 3D, caméras, lampes. Plus tard, ces objets pourront être appelés avec bpy.data.objects['nom_de_ton_objet'] où 'nom_de_ton_objet' peut être 'Plane', 'Camera'.
- Ajout de matériaux : les matériaux seront paramétrés comme avec l'interface de blender. Auparavant, Il est préférable de tester sur l'interface les choix de “texture_coords” et “mapping”.
- Initialisation de l'outil node : pour faire des images de profondeur enregistrées sous format openexr, il est nécessaire d'activer l'outil node de blender.
- Définition de la résolution des images rendues
- Choix de la caméra utilisée pour le rendu
- Rendu
- sample_code_blender_render.py
import bpy
import numpy as np
import os
import sys


#****** CREATE DIRECTORY WHERE TO SAVE IMAGES ***********
img_dir = '/tmp/images/'
if not os.path.exists(img_dir):
    os.makedirs(img_dir)

#****** SET GPU AS DEVICE ***********
# Before check your gpu compute device type
ver = bpy.app.version[0]*1000 + bpy.app.version[1]*10 + bpy.app.version[2]
if ver < 2782 :
# Before blender 2.78b
	bpy.context.scene.cycles.device = 'GPU'
	bpy.context.user_preferences.system.compute_device_type = 'CUDA'
else :
# Since blender 2.78b
	sysp = bpy.context.user_preferences.addons['cycles'].preferences
	sysp.compute_device_type = 'CUDA'
	bpy.context.scene.cycles.device = 'GPU'


#****** INITIALIZE THE BLENDER 3D WORLD ********
# gather list of items of interest.
candidate_list = [item.name for item in bpy.data.objects if item.type == "MESH" or item.type == "LAMP" or item.type == "CAMERA"]

# select them only.
for object_name in candidate_list:
    bpy.data.objects[object_name].select = True

# remove all selected.
bpy.ops.object.delete()

# remove the meshes, they have no users anymore.
for item in bpy.data.meshes:
    bpy.data.meshes.remove(item)

# delete all materials
for i in bpy.data.materials.values():
    bpy.data.materials.remove(i)

# delete all textures
for i in bpy.data.textures.values():
    bpy.data.textures.remove(i)

# delete all images
for i in bpy.data.images.values():
    # delete image path, this is only possible without a user
    i.user_clear()
    # delete all, except »Render Result«
    if i.name != "Render Result":
        bpy.data.images.remove(i)

#****** ADD OBJECTS ********
# Add a mesh
bpy.ops.mesh.primitive_plane_add(location=(0,0,0), radius=1.75)
plane = bpy.data.objects['Plane']

# Add a camera
bpy.ops.object.camera_add( location = ( 1.5, 0, 5), rotation = ( 0,0.3,0 ) )

# Add a lamp
bpy.ops.object.lamp_add( location = ( 1.0, -1.0, 6.0 ), type = 'POINT' );

#****** ADD MATERIALS *********
# create material
plane_material = bpy.data.materials.new("plane_material") # new material
plane_material_texture = plane_material.texture_slots.add() # add texture slot to material
plane_material.specular_intensity = 0.0

# edit texture
plane_image_path = os.path.expanduser('ton_image.jpg') # get image (needs the lib os)
plane_image = bpy.data.images.load(plane_image_path) # load image

# create texture
plane_texture = bpy.data.textures.new("plane_texture", type = 'IMAGE') # create texture type "image"
plane_texture.image = plane_image # link picture to image

# link texture and material
plane_material_texture.texture = plane_texture
plane_material_texture.texture_coords = 'UV'
plane_material_texture.mapping = 'FLAT'

# prepare object
bpy.context.scene.objects.active = plane # select pyramid object
bpy.ops.object.mode_set(mode='EDIT') # switch to edit mode
bpy.ops.uv.smart_project() # automatically unwrap object
bpy.ops.object.mode_set(mode='OBJECT') # switch back to object mode
plane.data.materials.append(plane_material) # link material to object

#************* INIT NODE COMPOSITOR FOR DEPTH RENDERING ***********
# switch on nodes
bpy.context.scene.use_nodes = True
tree = bpy.context.scene.node_tree
links = tree.links

# clear default nodes
for n in tree.nodes:
    tree.nodes.remove(n)

# create input render layer node
rl = tree.nodes.new('CompositorNodeRLayers')
rl.location = 185,285

# create output node for color image
out_c_node = tree.nodes.new('CompositorNodeOutputFile')
out_c_node.location = 600, 200
out_c_node.format.file_format = 'PNG'

# create output node for z map
out_z_node = tree.nodes.new('CompositorNodeOutputFile')
out_z_node.location = 600, 400
out_z_node.format.file_format = 'OPEN_EXR'

#links
links.new(rl.outputs[2], out_z_node.inputs[0])  # render node to output file for Z image
links.new(rl.outputs[0], out_c_node.inputs[0])  # render node to output file for color image

#************* RENDER AND SAVE IMAGES ***********
# Define image resolution for rendering
bpy.data.scenes["Scene"].render.resolution_x = 250
bpy.data.scenes["Scene"].render.resolution_y = 250
# resolution percentage : have to be 100% to have the whole image resolution defined earlier
bpy.context.scene.render.resolution_percentage = 100

# Activate which camera will be used for rendering
# (if more than one camera are defined, the rendering have to be repeated for each camera)
bpy.context.scene.camera = bpy.data.objects["Camera"]

# Define path where to save images
str4 = img_dir + "image"
out_c_node.base_path = str4 + "000"
out_z_node.base_path = str4 +"_Z_"+ "000"

# Render
bpy.ops.render.render()#write_still=True)

#************* EXIT BLENDER  ***********
sys.exit(0)
Script python détaillé pour le moteur de rendu Cycles (photo-réalistique)
Le moteur de rendu doit être changé avec la variable “bpy.context.scene.render.engine”. Avec le rendu Cycles certaines choses changent :
- Les matériaux ne sont plus définis de la même façon. On doit déclarer des noeuds pour les matériaux. Ici, les coordonnées des textures sont “Generated” au lieu de “UV”, sinon l'image n'est plus visible sur le plan.
- La lampe est remplacée par “SUN” au lieu de “POINT”. En Cycles, la lampe “POINT” n'éclaire plus assez.
- sample_code_cycles_render.py
import bpy
import numpy as np
import os
import sys


#****** CREATE DIRECTORY WHERE TO SAVE IMAGES ***********
img_dir = '/tmp/images/'
if not os.path.exists(img_dir):
    os.makedirs(img_dir)

#****** SELECT RENDERING MODE (by default blender render) ***********
bpy.context.scene.render.engine = 'CYCLES'
print(bpy.context.scene.render.engine)
# Other parameters
#bpy.context.scene.cycles.progressive = 'PATH'
#bpy.context.scene.cycles.samples = 50
#bpy.context.scene.cycles.max_bounces = 1
#bpy.context.scene.cycles.min_bounces = 1
#bpy.context.scene.cycles.glossy_bounces = 1
#bpy.context.scene.cycles.transmission_bounces = 1
#bpy.context.scene.cycles.volume_bounces = 1
#bpy.context.scene.cycles.transparent_max_bounces = 1
#bpy.context.scene.cycles.transparent_min_bounces = 1
#bpy.context.scene.cycles.use_progressive_refine = True
#bpy.context.scene.render.tile_x = 64
#bpy.context.scene.render.tile_y = 64


#****** SET GPU AS DEVICE ***********
# Before check your gpu compute device type
ver = bpy.app.version[0]*1000 + bpy.app.version[1]*10 + bpy.app.version[2]
if ver < 2782 :
# Before blender 2.78b
	bpy.context.scene.cycles.device = 'GPU'
	bpy.context.user_preferences.system.compute_device_type = 'CUDA'
else :
# Since blender 2.78b
	sysp = bpy.context.user_preferences.addons['cycles'].preferences
	sysp.compute_device_type = 'CUDA'
	bpy.context.scene.cycles.device = 'GPU'


#****** INITIALIZE THE BLENDER 3D WORLD ********
# gather list of items of interest.
candidate_list = [item.name for item in bpy.data.objects if item.type == "MESH" or item.type == "LAMP" or item.type == "CAMERA"]

# select them only.
for object_name in candidate_list:
    bpy.data.objects[object_name].select = True

# remove all selected.
bpy.ops.object.delete()

# remove the meshes, they have no users anymore.
for item in bpy.data.meshes:
    bpy.data.meshes.remove(item)

# delete all materials
for i in bpy.data.materials.values():
    bpy.data.materials.remove(i)

# delete all textures
for i in bpy.data.textures.values():
    bpy.data.textures.remove(i)

# delete all images
for i in bpy.data.images.values():
    # delete image path, this is only possible without a user
    i.user_clear()
    # delete all, except »Render Result«
    if i.name != "Render Result":
        bpy.data.images.remove(i)


#************* INIT NODE COMPOSITOR FOR DEPTH RENDERING ***********
# switch on nodes
bpy.context.scene.use_nodes = True
tree = bpy.context.scene.node_tree
links = tree.links

# clear default nodes
for n in tree.nodes:
    tree.nodes.remove(n)

# create input render layer node
rl = tree.nodes.new('CompositorNodeRLayers')
rl.location = 185,285

# create output node for color image
out_c_node = tree.nodes.new('CompositorNodeOutputFile')
out_c_node.location = 600, 200
out_c_node.format.file_format = 'PNG'

# create output node for z map
out_z_node = tree.nodes.new('CompositorNodeOutputFile')
out_z_node.location = 600, 400
out_z_node.format.file_format = 'OPEN_EXR'

#links
links.new(rl.outputs[2], out_z_node.inputs[0])  # render node to output file for Z image
links.new(rl.outputs[0], out_c_node.inputs[0])  # render node to output file for color image


#****** ADD OBJECTS ********
# Add a mesh
bpy.ops.mesh.primitive_plane_add(location=(0,0,0), radius=1.75)
plane = bpy.data.objects['Plane']

# Add a camera
bpy.ops.object.camera_add( location = ( 1.5, 0, 5), rotation = ( 0,0.3,0 ) )

# Add a lamp
bpy.ops.object.lamp_add( location = ( 1.0, -1.0, 6.0 ), type = 'SUN' );


#****** ADD MATERIALS *********
# Create material
plane_material = bpy.data.materials.new("plane_material") # new material

# Activate nodes for materials
plane_material.use_nodes = True
plane_nt = plane_material.node_tree
plane_nodes = plane_nt.nodes
plane_links = plane_nt.links

# clear previous materials nodes
while(plane_nodes): plane_nodes.remove(plane_nodes[0])

# Add nodes for materials
plane_output  = plane_nodes.new("ShaderNodeOutputMaterial")
plane_diffuse = plane_nodes.new("ShaderNodeBsdfDiffuse")
plane_texture = plane_nodes.new("ShaderNodeTexImage")
plane_texcoord   = plane_nodes.new("ShaderNodeTexCoord")

# edit texture and texture coordinates
plane_image_path = os.path.expanduser('ton_image.jpg') # get image (needs the lib os)
plane_texture.image = bpy.data.images.load(plane_image_path) # load image

# Links materials nodes
plane_links.new( plane_output.inputs['Surface'], plane_diffuse.outputs['BSDF'])
plane_links.new(plane_diffuse.inputs['Color'],   plane_texture.outputs['Color'])
plane_links.new(plane_texture.inputs['Vector'],    plane_texcoord.outputs['Generated'])

# Distribute nodes along the x axis
for index, node in enumerate((plane_texcoord, plane_texture, plane_diffuse, plane_output)):
    node.location.x = 200.0 * index

# Link material to object
plane.data.materials.append(plane_material)


#************* RENDER AND SAVE IMAGES ***********
# Define image resolution for rendering
bpy.data.scenes["Scene"].render.resolution_x = 250
bpy.data.scenes["Scene"].render.resolution_y = 250
# resolution percentage : have to be 100% to have the whole image resolution defined earlier
bpy.context.scene.render.resolution_percentage = 100

# Activate which camera will be used for rendering
# (if more than one camera are defined, the rendering have to be repeated for each camera)
bpy.context.scene.camera = bpy.data.objects["Camera"]

# Define path where to save images
str4 = img_dir + "image"
out_c_node.base_path = str4 + "000"
out_z_node.base_path = str4 +"_Z_"+ "000"

# Render
bpy.ops.render.render()#write_still=True)

#************* EXIT BLENDER  ***********
sys.exit(0)
Ajout de modules python externes
Blender est livré avec son propre python. On le trouve à l'emplacement suivant : “chemin_vers_le_dossier_blender/blender-2.79-linux-glibc219-x86_64/2.79/python/lib/python3.5/”. Votre version de blender (ici 2.79) et de python (ici 3.5) sera à adapter à votre configuration. On retrouve à l'emplacement “python3.5/site-packages” les modules “numpy” et “requests” déjà présent dans blender.
Pour importer de nouveaux modules dans mes scripts, j'ai appliqué la solution suivante :
- faire en sorte que la version de python installé et celle de blender coïncide. Télécharger la dernière version de blender dont le python intégré a la bonne version.
- télécharger les modules voulus sur le python3 installé dans /usr/local/ (l'adresse dépend de votre installation)
- ajouter dans le script python les chemins vers les modules externes recherchés : sys.path.append('/usr/local/lib/python3.5/site-packages/') et sys.path.append('/usr/local/lib/python3.5/lib-dynload/') pour tkinter utilisé par matplotlib. Les chemins doivent être ajouté avant d'inclure les modules avec “import”.
- ajouter sys.path.append('chemin_vers_le_dossier_contenant_le_script') et lancer la commande ./chemin_vers_blender/blender -P mon_script.py, si le script n'est pas à emplacement de l'exécutable python
Si la version de numpy de blender ne coïncide pas avec celle utilisée par les modules externes, renommez le numpy de blender (par exemple en 'numpy_1.10.1'). Le script utilisera alors le numpy installé dans /usr/local/.
Pour voir la version de numpy, entrer dans la console python :
>>> import numpy
>>> numpy.version.version
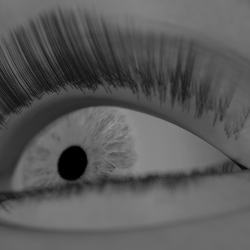
Animation modèle de visage
charger la scène Swirski-EyeModel.blend
Mode d'affichage default
Développer l'arbre Armature Head→the rig→Pose_head.002→eyetargetparent
à droite, choisir mode Bone (OS)
en bas, chosir Pose Mode
à droite dans transform→Location, changer x,y,z pour spécifier la cible visée par l'oeil
passer en mode scripting
recliquer sur Bone et changer transform→Location, la commande python correspondante apparait dans la console:
bpy.context.object.pose.bones["eyetargetparent"].location[0] = -0.113456
bpy.context dépend de l'objet actuellement selectionné dans la GUI, pour modifier dans le script, il faut retrouver dans l'arborescence de la scene (s'aider de l'auto complétion avec CTRL+SPACE)
scene = bpy.context.scene
armature = bpy.data.objects['Armature Head']
armature.pose.bones['eyetargetparent'].location[0] = -0.113456
./blender-2.74-linux-glibc211-x86_64/blender --python ./Swirski-EyeModel.py -b
- Swirski-EyeModel.py
import bpy
import math
import mathutils
import os
import sys
import numpy as np
#lancer avec  ./blender-2.74-linux-glibc211-x86_64/blender --python ./Swirski-EyeModel.py -b


#****** CREATE DIRECTORY WHERE TO SAVE IMAGES ***********
img_dir = '/tmp/images/'
if not os.path.exists(img_dir):
    os.makedirs(img_dir)


bpy.ops.wm.open_mainfile(filepath="/media/HD500GO/blender/Swirski-EyeModel.blend")

scene = bpy.context.scene
armature = bpy.data.objects['Armature Head']
camera_obj = bpy.data.objects['Camera']
camera = bpy.data.cameras['Camera']

eyeL = bpy.data.objects['eye.L']
pupilGroup = eyeL.vertex_groups['eyepulpex.L']
pupilVertices = [v for v in eyeL.data.vertices if pupilGroup.index in [g.group for g in v.groups]]

pupil_base_radius = max((v1.co - v2.co).length for v1 in pupilVertices for v2 in pupilVertices) * eyeL.scale[1]

eyeLbone = armature.pose.bones['def_eye.L']
pupilLbone = armature.pose.bones['eyepulpex.L']

def strVec(vec):
    return "({},{},{})".format(vec[0], vec[1], vec[2])

datafilepath = os.path.join(os.path.dirname(bpy.data.filepath), "render_eye_data.txt")


# switch on nodes
scene.use_nodes = True
tree = scene.node_tree
links = tree.links

# clear default nodes
for n in tree.nodes:
    tree.nodes.remove(n)

# create input render layer node
rl = tree.nodes.new('CompositorNodeRLayers')
rl.location = 185,285

# create output node
v = tree.nodes.new('CompositorNodeViewer')
v.location = 750,210
v.use_alpha = False

# create output node
of_c_node = tree.nodes.new('CompositorNodeOutputFile')
of_c_node.location = 600, 200
#of_node.base_path =
of_c_node.format.file_format = 'PNG'

# Links
links.new(rl.outputs[0], v.inputs[0])  # link Image output to Viewer input
links.new(rl.outputs[0], of_c_node.inputs[0])

# Define path where to save image
base_path = "/tmp/images" #"./images_test_png"


with open(datafilepath, "w") as datafile:
    #for frame in range(scene.frame_end+1):
    for frame in range(2):
        scene.frame_set(frame)
        #modification position de visée de l'oeil
        print('Jessica et Bertrand sont passés par la');
        armature.pose.bones['eyetargetparent'].location[0] = -0.113456

        camera_mat = camera_obj.matrix_world * mathutils.Matrix([[1,0,0,0],[0,-1,0,0],[0,0,-1,0],[0,0,0,1]])

        camera_invmat = camera_mat.inverted()
        armature_mat = armature.matrix_world

        head_world = armature_mat*eyeLbone.head
        tail_world = armature_mat*eyeLbone.tail

        head_cam = camera_invmat*head_world
        tail_cam = camera_invmat*tail_world

        eye_centre = head_cam
        eye_radius = eyeLbone.bone.length
        pupil_gaze = (tail_cam - head_cam).normalized()
        pupil_radius = pupilLbone.scale[0] * pupil_base_radius
        pupil_centre = eye_centre + eye_radius*pupil_gaze

        #framestr = "{} | head_world: {} | tail_world: {} | vec_world: {} | head_cam: {} | tail_cam: {} | vec_cam {}".format(
        #       frame, *[strVec(x) for x in [head_world,tail_world,vec_world,head_cam,tail_cam,vec_cam]])
        framestr = "{} {} {} {} {} {}".format(
            frame,
            strVec(eye_centre),
            eye_radius,
            strVec(pupil_centre),
            strVec(pupil_gaze),
            pupil_radius
            )
        print(framestr)
        print(framestr, file=datafile)
        #************* RENDER AND SAVE IMAGES ***********
# Define image resolution for rendering
        scene.render.resolution_x = 250
        scene.render.resolution_y = 250
# resolution percentage : have to be 100% to have the whole image resolution defined earlier
        scene.render.resolution_percentage = 100

# Activate which camera will be used for rendering
# (if more than one camera are defined, the rendering have to be repeated for each camera)
        scene.camera = bpy.data.objects["Camera"]


# get viewer pixels directly
        #pixels = bpy.data.images['Viewer Node'].pixels
        #print(len(pixels)) # size is always width * height * 4 (rgba)

# copy buffer to numpy array for faster manipulation
#       arr = np.array(pixels[:])
#        print('one pixel \n',arr[100:104])


# Define path where to save images
        str4 = base_path + "/image"
        of_c_node.base_path = str4 + "000"
        #out_z_node.base_path = str4 +"_Z_"+ "000"

# Render
        bpy.ops.render.render()#write_still=True)

#************* EXIT BLENDER  ***********
        sys.exit(0)
Accélérer le rendu
Plusieurs astuces existent pour accelérer le rendu. Ces astuces diffèrent suivant si on est en “Blender render” ou en “Cycle render”.
Lien pour le “Cycle render”:
Lien pour “Blender render”:
Pour le calcul de Blender occupe 100% du CPU il faut indiquer le bon nombre de threads et la bonne taille de tuile (“Tile size”) : https://blenderartists.org/forum/showthread.php?410469-Why-Blender-Cycles-Rendering-Not-Using-100-CPU